


To set up a Windows 11 PC for software development, update Windows, then use winget to install PowerShell 7, Git, VS Code (or Visual Studio), WSL 2 and Docker. Configure Git and an SSH key, and put your source code on a Dev Drive. Plan on an afternoon. The steps and commands are below, in the order I’d run them.
I’ve set up a lot of Windows machines for development over the years, at large companies and now for my own Fischost Solutions work. The tools have improved a great deal. Windows now ships with a package manager and a decent terminal, and Linux runs right next to everything else. The order you install things in still matters, though, and a few defaults are worth changing before they cause trouble. This guide replaces my older short post on installing Git on Windows 11.

What do you need before you start?
You need a fully updated Windows 11 PC, an administrator account, and about 100 GB of free disk space if you plan to use WSL, Docker and a Dev Drive. 16 GB of RAM is comfortable, and 8 GB will feel tight once containers are running.
Open Settings > Windows Update and install everything first, including optional quality updates. Dev Drive needs Windows 11 build 22621.2338 or later, according to Microsoft’s Dev Drive documentation, and WSL and Docker both behave better on a current build.
Check in Task Manager (Performance tab, CPU) that Virtualization: Enabled shows. If it says disabled, turn on Intel VT-x or AMD SVM in your firmware settings. WSL 2 and Docker Desktop both depend on it, and a fresh install that “won’t start” is usually this setting.
One more decision to make up front: which drive letter your Dev Drive will use. I’ll use D: in the examples. Adjust if your machine already uses that letter.
How do you install developer tools with winget?
winget is the Windows Package Manager, and it ships with current Windows 11 builds as part of App Installer. One command installs a tool, and winget upgrade --all updates everything it knows about.
Open a terminal and confirm it’s there:
winget --version
winget source update
Here’s the core set I put on every development machine:
winget install --id Microsoft.PowerShell --source winget
winget install --id Git.Git -e --source winget
winget install --id Microsoft.VisualStudioCode -e --source winget
Always use --id with -e (exact match). Without them, winget does a fuzzy name search and sometimes asks you to pick from a list, or picks a package you didn’t mean.
A few habits that save time:
winget search <name>finds the exact ID before you install.winget listshows what’s installed, including apps you didn’t install with winget.winget upgrade --allonce a week keeps the whole toolchain current.winget export -o tools.jsonsaves your list, andwinget import -i tools.jsonrebuilds it on the next machine.
Should you use Windows Terminal and PowerShell 7?
Yes. Windows Terminal has been the default console in Windows 11 since the 22H2 update, and PowerShell 7 is the modern, cross-platform shell. Windows PowerShell 5.1 still ships with Windows, and PowerShell 7 installs alongside it.
Microsoft’s command-line team announced in October 2022 that Windows Terminal became the default in Windows 11, so you probably already have it. If you don’t, winget install --id Microsoft.WindowsTerminal -e installs it.
As of this writing, PowerShell 7.6 is the current Long Term Support release. Microsoft’s PowerShell support lifecycle page lists it as released March 18, 2026, built on .NET 10, and supported until November 14, 2028. PowerShell 7.4 and 7.5 both reach end of support on November 10, 2026. If you have either installed, upgrade:
winget upgrade --id Microsoft.PowerShellThen make PowerShell 7 your default profile in Windows Terminal: open Settings > Startup > Default profile and choose PowerShell (not “Windows PowerShell”). Check what you’re running with:
$PSVersionTable.PSVersionWhile you’re in Terminal settings, set the default terminal application to Windows Terminal, and add a profile for your WSL distro after you install it. Every shell you use then opens in tabs in one window.
How do you install and configure Git on Windows 11?
Install Git for Windows with winget, then set your name, email, default branch and line-ending behavior before your first commit. These settings go into your global .gitconfig and apply to every repository.
The official Git for Windows download page listed version 2.56.0 when I checked. It also notes that the Git.Git winget package is maintained by the community, not by the Git for Windows project, so it can lag a release or two behind. For day-to-day work that hasn’t been a problem for me. Close and reopen your terminal after installing so the PATH updates, then run:
git --version

git config --global user.name "Your Name"
git config --global user.email "you@example.com"
git config --global init.defaultBranch main
git config --global core.autocrlf true
git config --global pull.rebase false
git config --global core.editor "code --wait"
A few notes on those settings:
- core.autocrlf true checks files out with Windows line endings and commits them with Unix line endings. It’s the usual choice on Windows. For repositories you mainly edit inside WSL, clone them inside WSL and let Linux Git handle line endings.
- Better still, add a
.gitattributesfile to each repository (for example* text=auto). Then the repository controls line endings, not each developer’s machine. - pull.rebase false keeps the classic merge-on-pull behavior and stops Git from warning you on every pull. Set it to
trueif your team prefers rebasing.
Check the result with git config --global --list.
How do you create an SSH key for GitHub on Windows?
Generate an Ed25519 key with ssh-keygen, start the Windows OpenSSH agent service, add the key to it, and paste the public key into your Git host’s SSH settings. It takes about five minutes.
These steps follow GitHub’s SSH key documentation. Windows 11 includes the OpenSSH client.
- Generate the key, and give it a passphrase when prompted:
ssh-keygen -t ed25519 -C "you@example.com" - In an elevated PowerShell window, enable and start the agent:
Get-Service -Name ssh-agent | Set-Service -StartupType Manual Start-Service ssh-agent - In a normal (non-admin) window, add your key:
ssh-add $env:USERPROFILE\.ssh\id_ed25519 - Copy the public key and paste it into GitHub (Settings > SSH and GPG keys) or your Azure DevOps or GitLab equivalent:
Get-Content $env:USERPROFILE\.ssh\id_ed25519.pub | Set-Clipboard - Test it:
ssh -T git@github.com
Here’s a catch that trips people up. Git for Windows ships its own copy of ssh, and by default it does not use the Windows agent you just started, so Git keeps asking for your passphrase. The fix is to tell Git to use the Windows OpenSSH client:
git config --global core.sshCommand "C:/Windows/System32/OpenSSH/ssh.exe"Never copy the private key (the file without .pub) anywhere.
VS Code or Visual Studio: which should you install?
Install VS Code for almost everything: web, Node, Python, Go, scripting, and anything you run in WSL or containers. Add Visual Studio if you build .NET desktop apps or larger ASP.NET Core solutions, or if you write C++ with MSBuild.
I use both. VS Code is what I keep open all day. When I’m working on one of my ASP.NET Core apps with SQL Server, though, Visual Studio’s debugger, profiler and solution tooling are still worth the bigger install.
| VS Code | Visual Studio Community 2026 | |
|---|---|---|
| Best for | Most languages, WSL, containers, remote work | .NET, C++, large solutions |
| Install size | Small | Large; depends on the workloads you choose |
| winget ID | Microsoft.VisualStudioCode |
Microsoft.VisualStudio.Community |
| Cost | Free | Free for individuals; check the license terms for company use |
| WSL support | Excellent (WSL extension) | Supported for some project types |
Microsoft made Visual Studio 2026 generally available on November 11, 2025. The Visual Studio team says existing 2022 solutions and extensions carry over without migration, and the IDE now gets monthly updates. Install it with:
winget install --id Microsoft.VisualStudio.Community -eWhen the Visual Studio Installer opens, choose only the workloads you need (for example “ASP.NET and web development” and “.NET desktop development”). You can add more later. In VS Code, install the WSL, Dev Containers and C# Dev Kit or language extensions that match your stack, and don’t install more than you need.
How do you install WSL 2?
Open PowerShell as administrator, run wsl --install, and restart. That enables the required Windows features and installs Ubuntu running under WSL 2.
Microsoft’s WSL install guide covers the details. The short version:
wsl --install
# after the reboot, Ubuntu opens and asks for a Linux username and password

wsl --list --online          # see other distros
wsl --install -d Debian      # install a different one
wsl --list --verbose         # confirm everything shows VERSION 2
The Linux username and password are separate from your Windows account. The password is what sudo asks for. Inside the distro, update packages and set up Git again, because Linux Git has its own config:
sudo apt update && sudo apt upgrade -y
git config --global user.name "Your Name"
git config --global user.email "you@example.com"
The most important WSL rule for performance: keep Linux projects inside the Linux file system (~/projects), not under /mnt/c. Crossing between the two file systems is slow. I cover this, plus networking and the common errors, in my separate WSL 2 guide.
How do you install Docker on Windows 11?
Install Docker Desktop with winget and let it use the WSL 2 backend. Check the license first: Docker Desktop is free for personal use, education and small businesses, but larger companies need a paid subscription.
winget install --id Docker.DockerDesktop -eSign out and back in (or reboot), start Docker Desktop, and confirm the WSL 2 engine is selected in Settings > General. Under Resources > WSL integration, enable your Ubuntu distro so the docker command works from inside WSL. Test it:
docker run --rm hello-worldAbout licensing: the Docker Desktop license page says it’s free for small businesses (fewer than 250 employees and less than $10 million in annual revenue), personal use, education and non-commercial open source. Professional use in larger organizations and government entities requires a Pro, Team or Business subscription. If you’re setting up a work machine, check with whoever handles licensing before you install it.
If Docker Desktop doesn’t fit, you can install the Docker Engine directly inside your WSL distro. My Docker beginner’s guide compares the options.
What is Dev Drive and should you use it?
Dev Drive is a ReFS volume tuned for developer workloads: source code, package caches and build output. Microsoft Defender scans it in a lighter “performance mode.” If you build often, it’s worth setting up.
According to Microsoft’s Dev Drive documentation, you need Windows 11 build 22621.2338 or later, at least 50 GB of space, and local administrator rights. Microsoft recommends 16 GB of RAM (8 GB minimum). You can’t make C: a Dev Drive, and reformatting an existing volume erases it.
The easiest option is a virtual disk:
- Open Settings > System > Storage > Advanced storage settings > Disks & volumes.
- Select Create dev drive, then Create new VHD.
- Choose VHDX, dynamically expanding, at least 50 GB (I’d go bigger), and assign a drive letter such as
D:. - Confirm it’s trusted, which turns on Defender’s performance mode, from an elevated prompt:
fsutil devdrv query D:
Then move your package caches onto it. From an elevated prompt (Microsoft’s documented variables):
setx /M npm_config_cache D:\packages\npm
setx /M PIP_CACHE_DIR D:\packages\pip
setx /M MAVEN_OPTS "-Dmaven.repo.local=D:\packages\maven"
For NuGet, Microsoft suggests setting globalPackagesFolder in a NuGet config file instead of the NUGET_PACKAGES variable. Keep Visual Studio, SDKs and other tools on C:. Microsoft doesn’t recommend installing applications on a Dev Drive. Clone your repositories to something like D:\src.
Dev Drive is for Windows-side builds. Projects you build inside WSL still belong in the Linux file system.
Bottom line
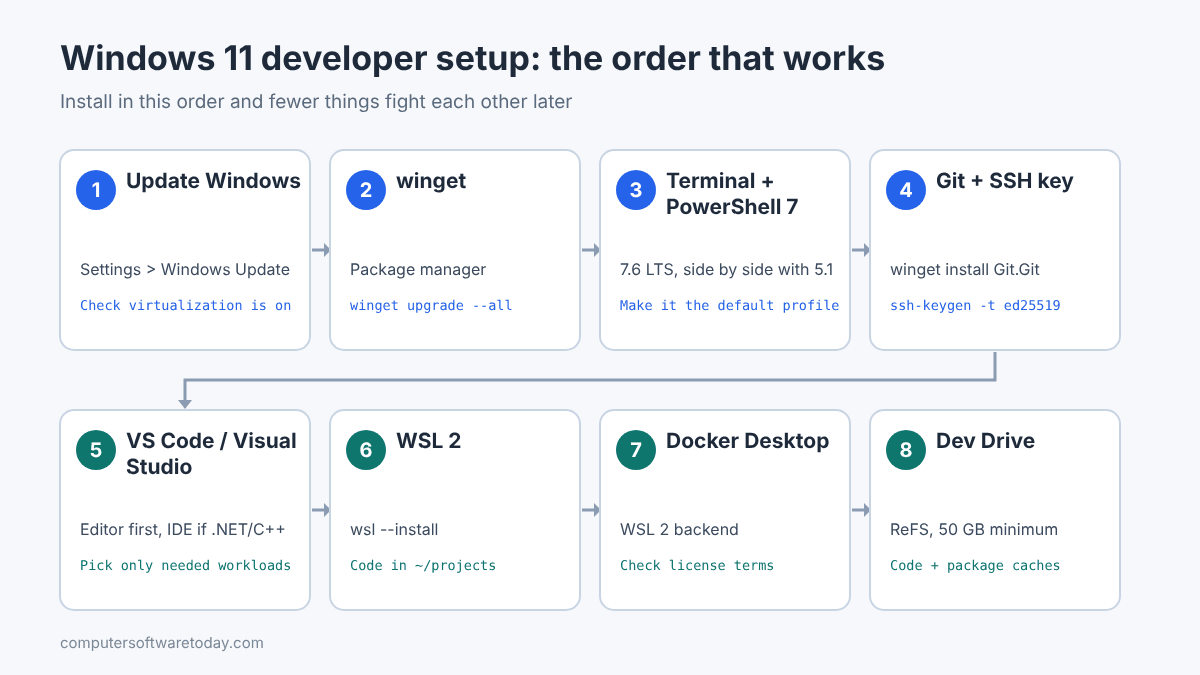
Install in this order: Windows updates, winget, PowerShell 7 and Terminal, Git with an SSH key, your editor, WSL 2, Docker, then a Dev Drive for code and caches. Write your winget commands into a script or export file as you go. The next time you set up a machine, and there’s always a next time, it takes twenty minutes instead of an afternoon. The rest is just remembering which shell you’re in.
FAQ
Do I need Windows 11 Pro for software development?
Mostly no. WSL 2, winget, Windows Terminal and Dev Drive work on Windows 11 Home. Docker’s current system requirements list Pro, Enterprise and Education, so check them before relying on Docker Desktop on Home. Pro also adds Hyper-V Manager, BitLocker management and domain join.
Should I use PowerShell 7 or Windows PowerShell 5.1?
Use PowerShell 7 for daily work. It’s actively developed, and 7.6 is the current LTS release, supported until November 2028. Keep 5.1 for the occasional older module or Windows admin script that still depends on it.
Where should I keep my source code on Windows 11?
For Windows-side projects, use a Dev Drive folder such as D:\src. For projects you build and run inside WSL, use the Linux file system, for example ~/projects, because accessing files across the boundary is slow.
Is Docker Desktop free?
It’s free for personal use, education, non-commercial open source and small businesses with fewer than 250 employees and under $10 million in annual revenue. Larger organizations and government entities need a paid Pro, Team or Business subscription.
Why does Git keep asking for my SSH passphrase on Windows?
Git for Windows uses its own bundled ssh by default, not the Windows ssh-agent service. Run git config –global core.sshCommand “C:/Windows/System32/OpenSSH/ssh.exe” so Git uses the agent that holds your key.
Can I script this whole setup?
Yes. Run winget export on a configured machine to save the package list, then winget import on the new one. Add your git config commands to a PowerShell script and most of the setup becomes repeatable.
Featured image: Photo by Boitumelo on Unsplash.